After being generously donated a 15mm French Ordonnance Army via Andrew, I took it out for a test drive against Tim and his Spaniards.
I apologise for any disorganisation between description and pictures - easier said than done!
Still learning, so no stratagems
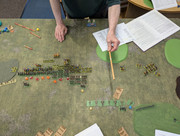
After rolling to play in the foggy very early morning, Tim decided to be kind and ignore time and weather - it wouldn't work out great for him and would be terrible for myself, with a cannon heavy army.
I got the terrain I wanted in the locations I wanted, but mistakenly thought I could place my cannons atop the steep hill - a rookie mistake!
A hastily drawn up army list gave myself 3 commands vs Tim's 2 commands.
Command 1 (Centre)
R. Kn (S) 1 35 C-in-C
R. Pk (I) 12 36
R. Pk (O) 12 48
Total ME: 28
Command 2 (Right flank)
R. Kn (S) 1 35 Sub General
R. Bow (O) 2 10 (Crossbowmen)
R. Ps (S) 3 9 (Hand gunners, incorrectly based)
R. Art (I) 2 8 (Organ guns)
R. Art (O) 3 24 (Serpentines)
R. Art (S) 2 20 (Bombards)
Total ME 14.5
Command 3 (Left flank)
R. Kn (S) 1 35 Sub General
R. Kn (S) 3 45
R. Cav (O) 3 24 (Knight models with unarmoured horses, upgraded Bowmen from 1481)
Irr Ps. (S) 3 9 (Spear chuckers taken from club stock, representing Landsknecht Skirmisher w/ handgun/arquebus)
Total ME 14.5
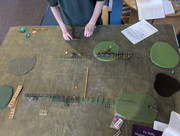
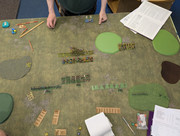
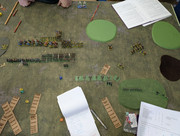
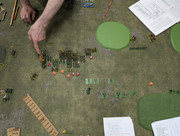
Setup;
Tim's Cavalry on his left flank (LH and Kn if I recall correctly) and pikemen flanked with Ps and Handgunners
Opposite his Pike, mine, with my cavalry on the left flank under Andrews command and an artillery park which I thought I could put on the steep hill instead being in it's shadow.
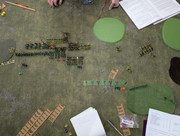
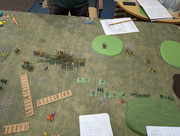
Turn 1
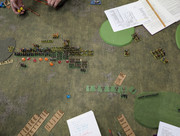
Tim's Spaniards started with a strong opening, 6 PIP's for his cavalry command and 5 for his infantry command
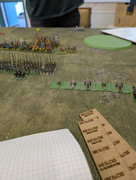
The bulk of his Knight cavalry command swings into column across the front of his pikemen, deciding that they can outnuber and overpower our left flank of our cavalry, leaving just his light horse to keep the artillery park company, no longer stationed facing them on a hill (as I'd originally intended)
With Andrew now present, he took the lead on my left cavalry flank, and made the threat posed by Tims cavalry clear to me. With some quick measurements though, he pointed out that we might be able to trap them between the opposing pike walls.
With 3 pip rolls all pulling a 3, we pushed the artillery park forward as one, 2 moves for 160paces (general attached).
The Pikemen also managed 2 moves forwards, 320 paces to close the gap on the column of horsemen, whilst the cavalry on the left flank moved forward with the attached general 240paces whilst the Psilloi on that flank used all 3 PiPs to move 600paces.
Turn 2
The Spanish cavalry continued their race across the front of the pikemen, and Tim's handgunners move up to hit the right flank of my pikemen - they are pushed back by artillery fire though (without any losses).
Rolls of 3,2 and 1 PiPs for the French allow Pike and Cavalry to move forward whilst a single gun wheels for a better line of fire.
The next shooting phase pushes the Spanish handgunners back out of range of the advancing pikemen
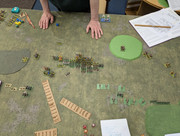
Turn 3
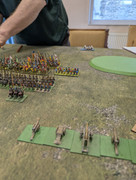
Poorly recorded by myself, I've got Tims spanish Cav advancing forward, his Light horse left on my right flank spreading out, his pike line breaking up, his handgunners being untouched by my artillery but a unit of his light horse being forced to flee in the bombardment
Rolls of 1, 2 and 4 allow the French Pk (I) to advance into Tims Knights, finally closing the gap.
The cavalry and knights on the flank advance, as does the Irr Ps (S), into the rough ground
The artillery park inflicts nothing upon the enemy handgunners, but causes another unit of the LH to flee
Our pikemen inflict a painful kill upon both a Kn (S) and a Kn (O)
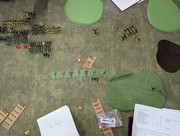
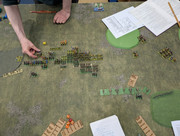
Turn 4
Tim rolls a 6 and a 5... so many PiPs, just when we were hoping he'd have none.
His knights take individual attack routes, his Knight general beats a hasty retreat through the Blade (F) on his infantry lines right flank (my left)
His pike line moves into contact
No PiPs are left to instruct his LH
A 5-2 bias in his favour means his handgunners finally manage to inflict a kill upon my pikemen
My serpentine has no effect on his handgunners, but another tube causes another unit of his LH to turn and flee
Rolls of 6,6 and 1 allow our cavalry to advance
In the shooting phase my artillery manage to kill 2 units of light horse, a resounding success.
In the pike melee, fatalities are felt by both combatants.
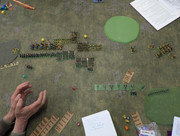
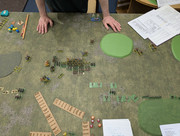
Turn 5
Tim rolls 2x 3's
The knights move and engage cavalry across my left flank In the shooting phase, my artillery hits another of Tims LH left behind on his left flank, killing it.
His Knights kill 2 of mine, braking my/Andrews cavalry command.
A roll of 6 and a 2 gives some PiPs to make some movements
Artillery general moves guys around as below
Pikemen engage across the front with one unit being moved for flank coverI send my CinC into his handgunners in a mad dash for glory, time is getting on now...
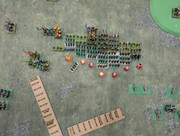
The shooting phase lets me turn another LH, but does very little else
In the melee though, my CinC manages to kill both ranks of handgunners, the overlap provided helps the adjoining pike kill the the first rank they are facing, and
across the pike melee there are kills and push backs - 5 total killed.
I had thought, after Tim broke our left flank, that the game had been won - but now it's not so clear.
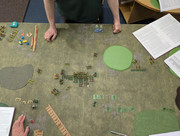
Turn 6
Tim rolls a 6 and a 4
With his cavalry command down to just 2 ME from break, he has to spend 3 PiPs to clear his LH from artillery range.
The melee in the centre returns very little results for either side
We move our pike into combat again, the artillery command moves the Ps(S) forward in an almost suicidal charge against the fleeing LH and the Artillery General moves over
In the melee phase we manage to dishearten the enemy, sadly my notes are weak on this, but I seem to remember my Pike pushing back his CinC (Kn (S)?)
Turn 7
Tim rolls high, but with Disheartened commands his movement is limited.
His CinC is faced with my Pk again, and is pushed back, and across the front a number of lucky rolls, and frankly, just surviving, manages to break the Spanish force and result in a Win for myself.

Close at the end, poorly set up forces by myself, and Tim made a fatal flaw on Turn 1 by moving across the front of his Pk line with his Kn and not behind it (he'd clocked it the second we rolled for our bound, and Andrew started measuring up how to close the gap)
A good fun game, with a result and progression that felt like it could have happened in reality, both in terms of forces involved and the battlefield mistakes.
Thanks for reading!
Duncan
