Late Imperial Romans at BRITCON 2014.
Not all the Late Romans, mainly the ones I was using.
A couple of years ago I thought it might be possible to enhance my Late Romans into a super-army by adding some Gothic warband and Legionaries with heavy clubs, so I bought and painted the required figures. For the warband I used an assortment of Germanics plus a few Roman Auxilia figures to keep them in order. The Bd(X) were legionary standard bearers with scratch-built clubs. All the figures were from the old Donnington ranges, now “Ancient and Modern”. The army now had Warband to take out Bw(S) and dismounted knights, Bd(X) for mounted knights, Ax(S) for terrain, Art(F) for elephants and war wagons, Bd(O) to be generally tough, Knights for cavalry, Cavalry for light horse and quite a lot of light horse of its own. I tested it out against a Burgundian Ordonnance army and it lost every game. That year I took the Burgundians to the Worlds/CANCON and the Late Romans retired to the back of the army cupboard, although they did put in an appearance in their “Patrician” incarnation with the warband on sabot bases posing as Foederati irregular auxilia.
This year the Worlds was restricted to Book 2 dates, so I thought I might dig the LIR army out again and use it for that. I gave them a try-out in the one-day book 2 competition at Milton Keynes. As a result of that experience I felt they had potential, but I would need quite a few more games under my belt to really get the hang of them. Over the next few months I tweaked the composition but had limited opportunities to play actual games. I hoped that by taking them to BRITCON I would be able to get enough experience with the army that I might be reasonably competent with it when I got to the Worlds.
The Final list was:
Late Imperial Roman, 407 AD, Western in Gaul. This date and location corresponds to the army Constantine III brought out of Britain, though I'm not sure how closely it corresponds to the composition he might have had.
CinC RLHS, 12 WbO, 4 BdO, 4 BdX, 2 RPsO (supporting Bd), 5 ILHS - 28 ME
Sub RCvO, 6 RLHO, 3 RCvO, 3 RKnF, 2 RPsS – 24 ME
Sub RCvO, 5 RAxS, 5 RAxO, 4 RPsO (Supporting Auxilia), 1 RPsS, 2 RArtF – 20 ME
Army baggage 6 RBgeO – 12 ME
The general idea is for the CinC to have the high dice and do most of the fighting. The mounted command supports as best it can, but isn't strong enough to be the primary battle-winner. The auxilia command takes the low dice to hold a flank and can afford to lose all the half ME elements, while the general manoeuvres the artillery behind the rest of the army to pick on any suitable targets. The army has the antidote to everything*, but it can be difficult to coordinate all the different tactical elements.
(* TBH it's not that good against Light Horse armies or huge irregular armies)
Game 1 versus Greg Mann, Seleucid
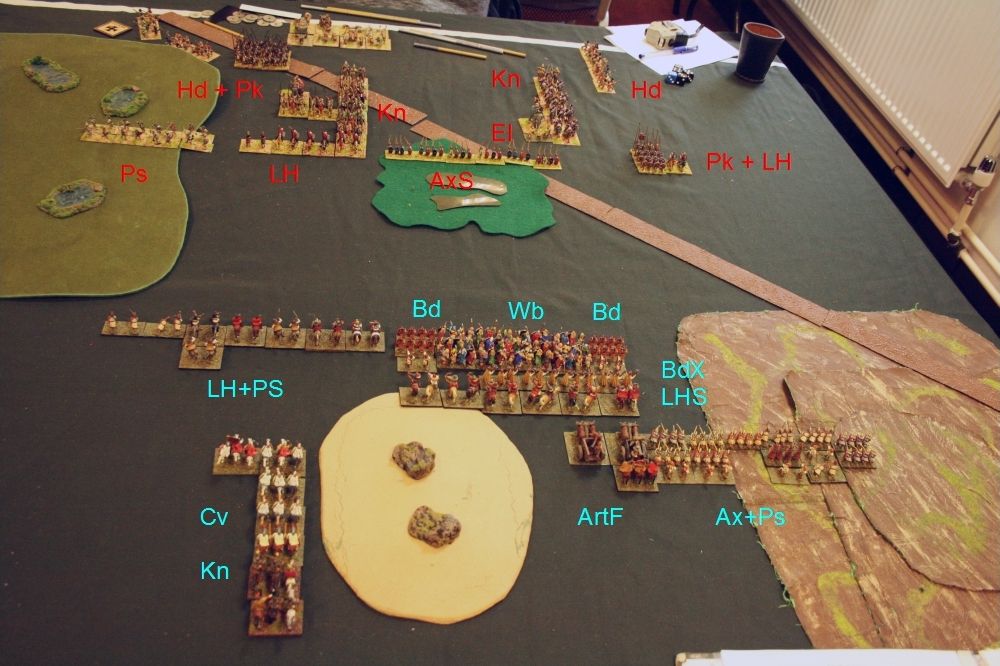
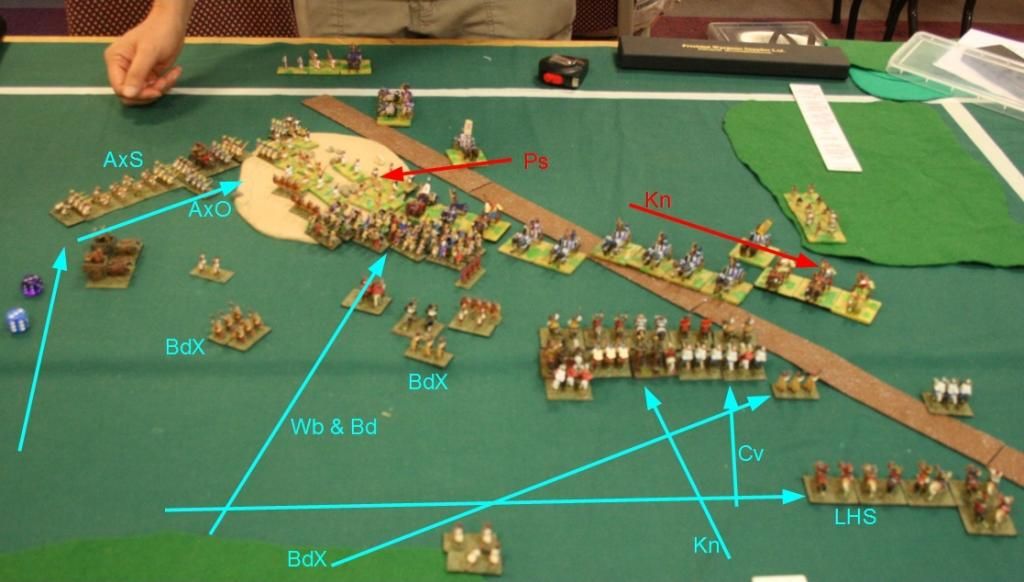
I defended. Significant terrain was a large gentle hill at my rear right, a large marsh at Greg's rear right and a small boggy flat in the middle of the table, just in Greg's half. I decided to try the unexpected, so put my mounted command next to the marsh, the Auxilia on the open flank to hold the hill and the CinC in the centre.
Greg's commands were:
8 Ps (in the marsh), 8 KnF including CinC, 4 LH and an elephant next to it;
8 Pk and 4 Hd behind the knights above;
6 AxS in a single rank in the bog, 5 Knight wedges to (my) right of it, 1 Ps and 1 El behind;
4 PkS 1 LHF and 4 Hd opposite the gentle hill.
The elephants were at the back, far out of artillery range.
It was obvious that the central bog would be key terrain. I could have simply charged it with the warband that were in front of it, but I decided to try getting more of the blades into this fight on the basis that they would be more effective against AxS in the long run. I also wanted to get some warband out towards the knights in order to break them up at low cost in ME so the clubmen could pick them off. This rearrangement delayed my attack for 1-2 bounds.
Greg rushed his PkO command forward and expanded them in front of his knights to pin my LH and cavalry and protect the flank of his psiloi that also rushed forward (unopposed) in the marsh. He also advanced with the PkS, backed them up with a few knights from the CinC's command and moved the knight wedges outside the flank of the PkS. I moved the Alan Mercenaries (LHS) onto the hill to oppose the wedges. The auxilia had to advance off the hill to support the flank of the CinC's command.

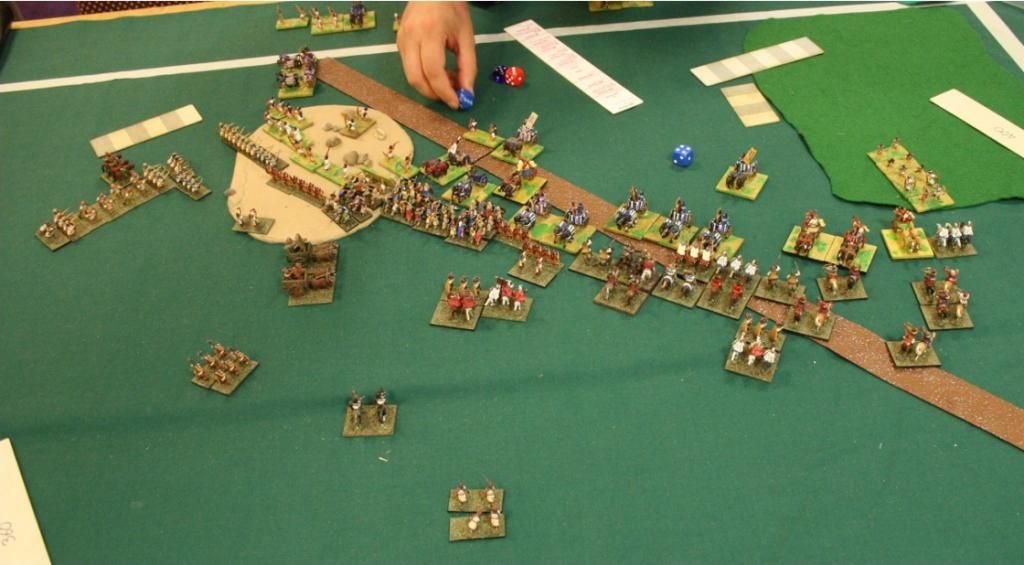
There then followed a rather interesting fight. On the left, the combination of pike from the front and psiloi from the flank was gradually logorating my mounted command, while a light horse and knight melee raged behind the pikes, with casualties on both sides.
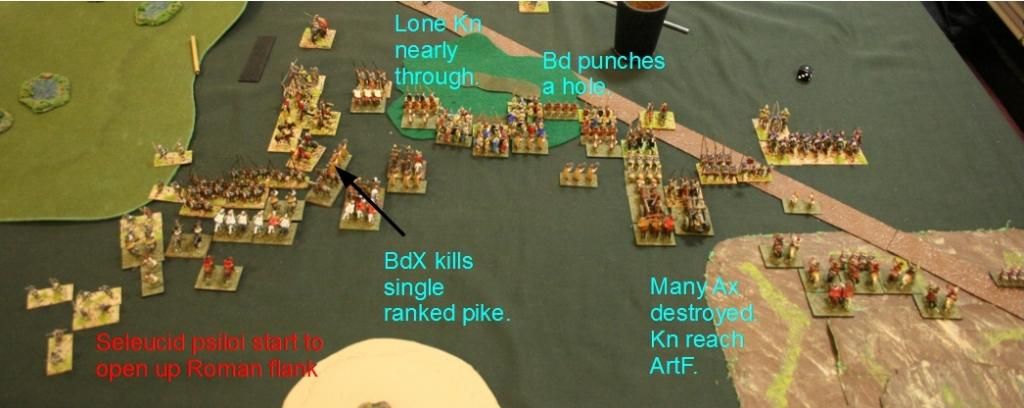
On the right, the combination of PkS and knights broke my auxilia command and the knights were able to pull back behind the pikes before I could get the LHS into them. In the centre, my heavy foot were steadily wearing down the Seleucid thureophoroi. Try as I might, I couldn't get any BdX into contact with any knights.
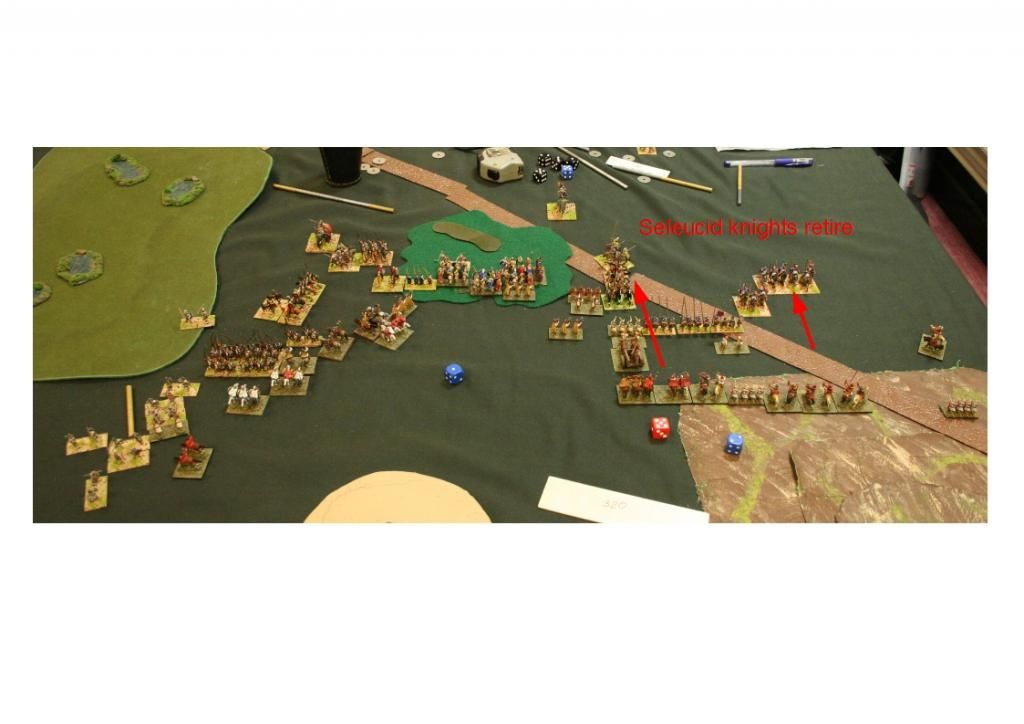
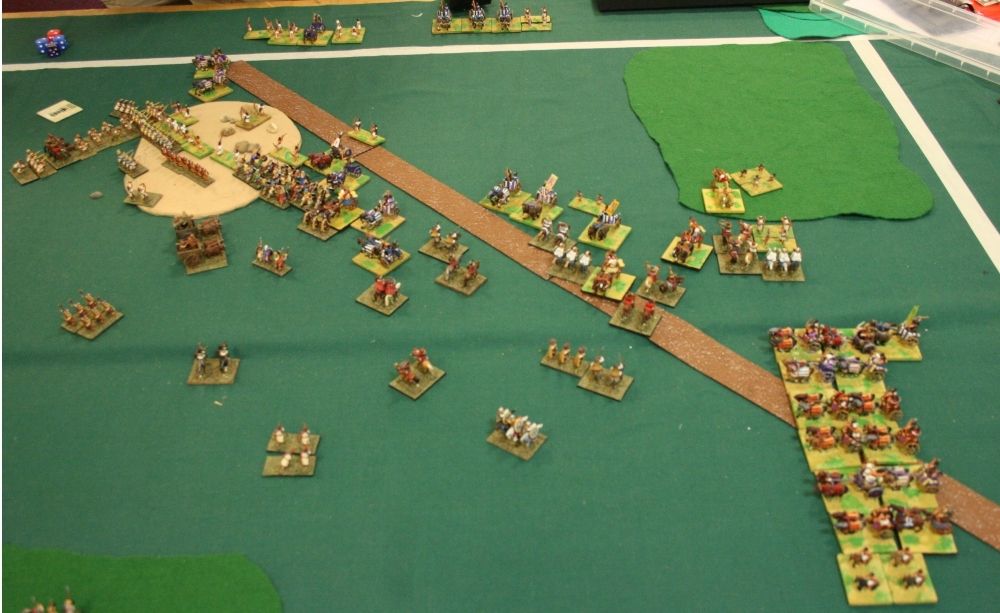
Eventually I wiped out all the thureophoroi and was able to get a good hit on the knight wedges with the LHS and broke that command. However, things were getting pretty desperate next to the marsh with both sides' mounted commands disheartened. I was in a worse position, exposed to many hard flank and rear attack opportunities. In a do-or-die attack I threw my cavalry general into a light horse and a knight next to him into a knight. If the general destroyed his opponent, the knight would get the benefit of the +1 bonus, an overlap and the opponent's F grading factor for a good chance to win the game.

The general got the desired result, but the knight didn't. Greg counterattacked with his general, killed mine and broke my army. 7-18
Greg's victory was, of course, due to his cheesy use of single ranked pike and nothing to do with a better deployment plan, manoeuvre scheme, or the masses of knights backing up the pikemen.
Game 2 versus Steve Rathgay, Ugaritic
I have played Steve a couple of times and he generally has a trick or two up his sleeve. In this case his first trick was to place a wood in the centre front of my deployment area. Other terrain was another wood at his rear left, a marsh in the middle of the (my) left table edge and a rocky hill in the middle of Steve's deployment area.
I deployed my auxilia near the marsh and the CinC's command in the front of the wood, ready to move out in a single move. This meant I couldn't deploy in as much depth as I normally would. My mounted command was on the right.
Steve deployed a command of psiloi and cavalry chariots on and around the rocky hill, angled back and anchored on the table edge, and a command of CvS and KnO chariots between the hill and the wood, with a few psiloi in the woods and in reserve. The gap between the hill and marsh was suggestive of a delayed command and the general lack of troops suggested there was also a flank march.
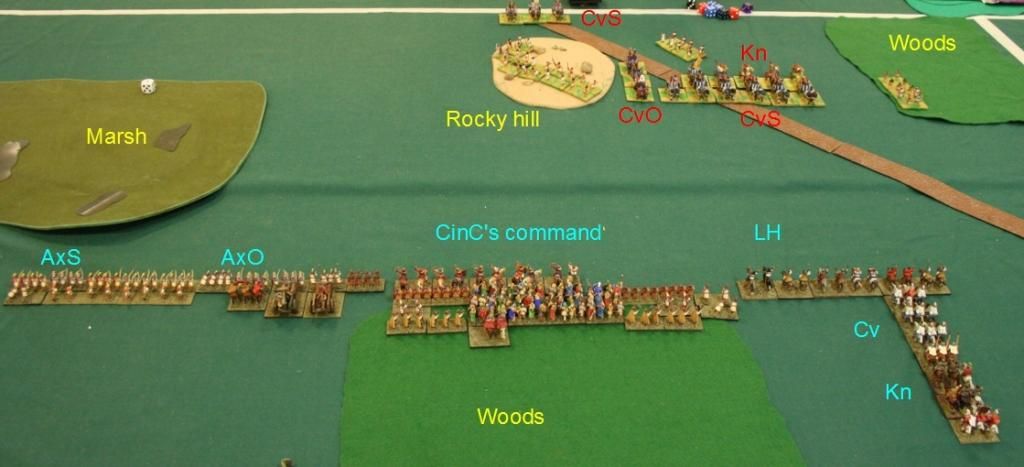
I would have to use the auxilia to kill the psiloi on the hill, so I gave that command the middle dice and the mounted command the low one. The CinC used the high dice to wheel the heavy foot towards the enemy chariots and feed the BdX and LHS generally towards the enemy knights, which were moving out to my right. Once the Auxilia were more or less in position, I switched dice so the mounted command would have the middle dice once combat was joined. The auxilia wouldn't need PIPs as the enemy psiloi would charge impetuously down the hill onto them and then be pursued up it. The artillery would not be able to see the psiloi among the rocks to shoot them, so wheeled towards the centre in the hope of getting some shots in at chariots over the heads of the warband and blades. Careful observation of the 5's on Steve's PIP dice told me that neither of the missing commands was delayed. Steve used the time to arrange his line as well as he could to avoid overlaps and flank contacts and reinforced the rocky hill with his reserve psiloi.
Eventually my knights charged the CvS and the LHS charged the KnO with overlaps. I lost a knight and the only combat I won was a CvS destroyed by my cavalry. In the ensuing melee, I lost a blade and the remaining knights in exchange for two more CvS. In the centre I was slowly losing warband to the cavalry chariots and a knight that I hadn't noticed earlier.
Meanwhile the first flank march had arrived and reached the Roman camp. In my next bound the loss of a blade + psiloi to the CvS's dreaded “+1 if scoring higher than foot in an enemy bound” exposed my cavalry general to a front-and-flank attack, which duly dispatched him, breaking the mounted command. Steve had had low PIPs so had to leave himself open to a number of good quick-killing counter-attacks, which might have broken his knight command. However, time was called and, even if we had played on, his other flank march of countless CvS chariots was now on, so I wouldn't have lasted much longer.
Steve's double flank march was probably a mistake, but my inefficient use of the auxiliaries and then poor combat dice meant I failed to take proper advantage of it and in the end I was lucky to get away with a draw at 10-15. And I still haven't kicked the habit of attacking up enemy-held hills, which I seem to find myself doing with distressing regularity.
